
Unlike WordPress, Blogger does not support plugins and as a result you can have extra customization of your blog. There are several plugins that delivers specific contents and widgets for wordpress but we are not allowed it in Google. But Blogger is highly customizable. If you are a group of authors working on a blogger blog, posting separately and want to show your biography or personal information on your posts, you can do so by applying author specific hack.
Let’s begin with the tutorial.
First of all plan for the layout of the author’s description section.

Have a reference of above image, it is of wordpress theme.
We’ll use CSS and HTML to layout the author’s biography section. Open Dreamweaver or Notepad and code your basic layout there. Then style it with proper and valid CSS.
Now we’ve the layout ready. We’ll have to add Blogger’s conditional tags to it for specific user. Let me show you how to do this.
If you don’t know much about codding, then just follow the methods described below:
1. Login to Blogger dashboard
2. Navigate to Layout> Edit HTML and Expand Widget templates
3. Search for the following code inside your template : <data:post.body/><b:if cond="data:post.author== "AUTHORNAME">
<div class="about-author">
<div class="author-info"> <img src="http://www.imageshack.com/image_suraZ.jpg" /> <br />
<data:post.author/>
</div>
<div class="author-data">
<p> suraZ has been posting lots of article in You Can Hack Blog.</p>
</div>
</div>
</b:if><b:if cond="data:post.author== "ANOTHER_AUTHORNAME">
<div class="about-author">
<div class="author-info"> <img src="http://www.imageshack.com/image_suraZ.jpg" /> <br />
<data:post.author/>
</div>
<div class="author-data">
<p> suraZ has been posting lots of article in You Can Hack Blog.</p>
</div>
</div>
</b:if><b:if cond="data:post.author== "YET_ANOTHERAUTHOR">
<div class="about-author">
<div class="author-info"> <img src="http://www.imageshack.com/image_suraZ.jpg" /> <br />
<data:post.author/>
</div>
<div class="author-data">
<p> suraZ has been posting lots of article in You Can Hack Blog.</p>
</div>
</div>
</b:if>Refer to the image for more clarification:
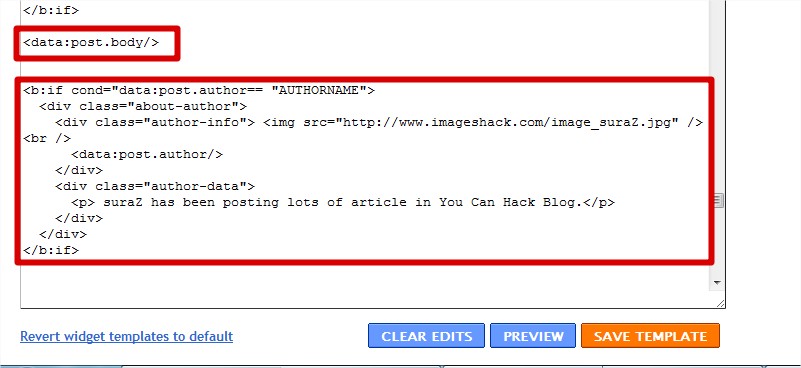
Replace the author name according to your need and information as well. Save the changes you have made. You are done.
Now search for <b:skin><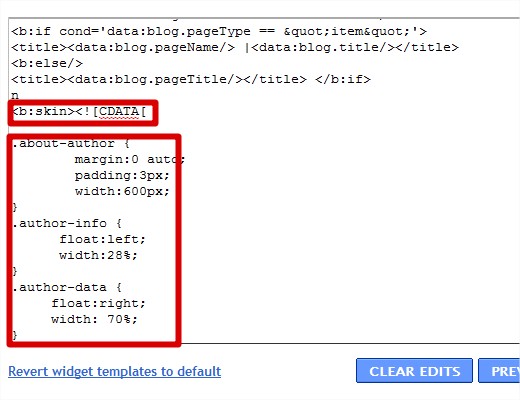
If you have more users then continue adding it just below one another end. You can see the working demo in this blog and in Hacktutors
 Posted in
  Tags:
Tags: